Caulking 101 is one of the easiest yet most essential skills for any homeowner or DIY enthusiast. Whether you’re sealing gaps around windows, protecting your kitchen from water damage, or finishing your baseboards, caulking is the unsung hero of home maintenance. In this Caulking 101 guide, we’ll break down everything you need to know to master the art of caulking, from selecting the right materials to applying it flawlessly.
For those who want a professional finish without the hassle, Zaka caulking Cleaning offers expert services to ensure that every caulking job is done to perfection.
What Is Caulk and Why Should You Use It?
Caulking 101: Caulk is a flexible sealing material used to fill gaps, cracks, and joints between different surfaces. Its primary function is to prevent air, water, dirt, and moisture from entering, creating a tight seal that enhances the comfort and integrity of your home.
Why Should You Use Caulk?
Using caulk helps improve energy efficiency by sealing drafts around your home, keeping your space warmer in winter and cooler in summer. Additionally, it prevents water damage, reducing the risk of mold and mildew buildup, especially in high-moisture areas like bathrooms and kitchens. Whether you’re a DIYer or need professional assistance, Zaka caulking Cleaning can help you keep your home well-sealed, energy-efficient, and protected from the elements.
Types of Caulk and Their Uses
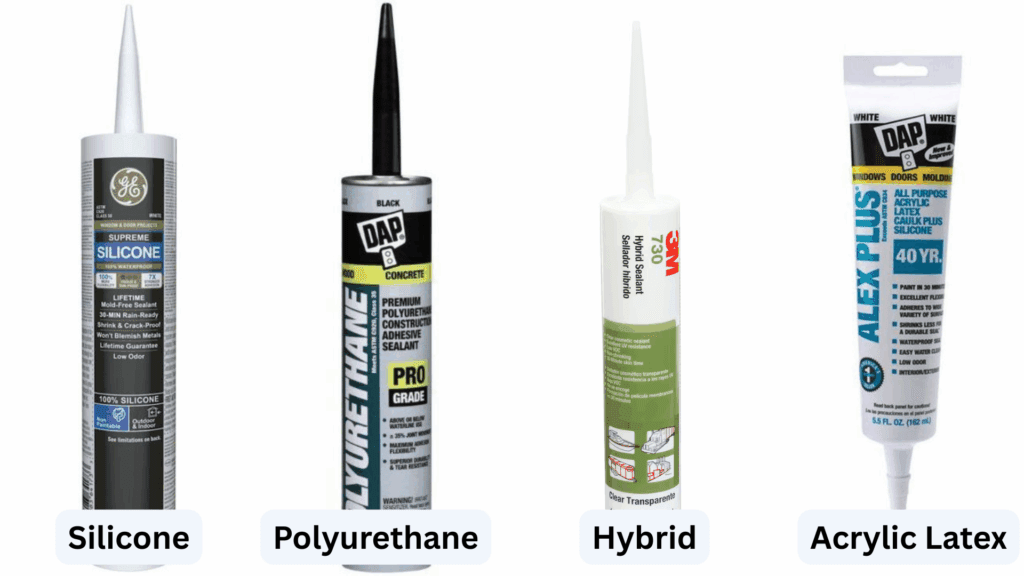
Understanding the different types of caulk and their specific uses is crucial for achieving the best results. Here’s a breakdown for your Caulking 101 toolkit:
Silicone Caulk
- Best For: Bathrooms, kitchens, windows, and high-moisture areas.
- Key Features: Waterproof, durable, and flexible.
- Drawback: Not paintable.
Acrylic Latex Caulk
- Best For: Woodwork, baseboards, trim, and drywall.
- Key Features: Paintable and easy to work with.
- Drawback: Less flexible than silicone, not ideal for wet areas
Polyurethane Caulk
- Best For: Exterior applications, such as sealing outdoor joints or cracks.
- Key Features: Strong, durable, and weather-resistant.
- Drawback: Takes longer to dry and cure.
Hybrid Caulks
- Best For: A variety of applications where you need both flexibility and paintability.
- Key Features: Combines silicone’s flexibility with the paintability of acrylic.
- Drawback: Can be more expensive than other options.
Tools and Materials You Will Need
Before you begin your Caulking 101 journey, make sure you have the right tools. Here’s a checklist:
Essential Tools for Caulking:
| Tool | Purpose |
|---|---|
| Caulk Gun | Dispenses caulk evenly and with control. |
| Utility Knife | Used to cut the tip of the caulk tube and remove old caulk. |
| Painter’s Tape | Helps create clean, straight lines and prevents caulk from spreading onto unwanted areas. |
| Caulking Tools | Smooth and shape the caulk bead for a professional finish. |
| Baby Wipes/Damp Cloth | For cleaning excess caulk and smoothing the bead while it’s still wet. |
By using the right tools, you ensure that your caulking 101 job looks clean and professional. For those who prefer expert help, Zaka caulking Cleaning offers top-notch caulking services with all the right tools to get the job done right.
Step-by-Step Caulking Process
Now, let’s break down the Caulking 101 process:
1: Prepare the Caulk Tube
- Cut the Nozzle: Use a utility knife to cut the tip of the caulk tube at a 45-degree angle. For most projects, aim for a ¼-inch opening for a uniform bead.
- Pierce the Inner Seal: Insert the tube into the caulk gun and use the gun’s piercer to break the inner seal.
2: Apply the Caulk
- Hold the caulk gun at a 45-degree angle and move it steadily along the joint. Apply caulk in a continuous bead to avoid gaps and uneven application.
3: Smooth the Caulk
- Use your finger or a caulking tool to smooth the bead. This step ensures the caulk adheres well to the surface and looks professional.
4: Remove the Painter’s Tape
- Immediately remove the painter’s tape before the caulk dries to reveal a clean, sharp line.
When to Re-Caulk: Signs That It’s Time for a New Application
Knowing when to re-caulk is essential for maintaining your home’s integrity, and this is also part of Caulking 101.
Signs It’s Time to Re-Caulk:
- Cracks or Gaps: If you notice the caulk is separating or cracking, it’s time to replace it.
- Mold or Mildew: In wet areas like bathrooms, mold or mildew growth around caulking is a sign it needs to be replaced.
- Water Leaks: If water begins seeping through the caulk, it means the seal is no longer effective.
Special Considerations for Different Projects

Depending on the project, you may need to adjust your approach:
Caulking for Windows and Doors
Use acrylic latex caulk to seal around windows and doors to block drafts. Ensure you clean and dry the frames thoroughly before applying caulk.
Caulking for Showers and Bathtubs
Silicone caulk is ideal for sealing around bathtubs and showers, as it’s waterproof and resists mold and mildew.
Caulking for Outdoor Projects
For exterior caulking, use polyurethane caulk to handle extreme temperatures and weather conditions.
If you need assistance with any of these projects, Zaka caulking Cleaning offers specialized services for both indoor and outdoor caulking.
FAQs
Q1: Can you caulk over existing caulk?
Yes, but only if the existing caulk is in good condition. If it’s cracked or peeling, remove it first. For best results, ensure the surface is clean and dry before applying new caulk.
Q2: How much time does caulk take to dry?
Most silicone caulk takes about 24 hours to fully cure. However, some types of latex caulk may dry faster—typically within a few hours.
Q3: What’s the best type of caulk for baseboards?
For baseboards, acrylic latex caulk is the best choice because it’s paintable, easy to apply, and provides a smooth finish.
Mastering the art of Caulking 101 is a valuable skill that can enhance the beauty and functionality of your home. Whether you’re sealing bathrooms, windows, or baseboards, proper caulking can prevent water damage, improve energy efficiency, and give your space a polished, professional look. If you prefer to leave it to the experts, Zaka caulking Cleaning is ready to help with all your caulking needs, ensuring a perfect, lasting result every time.